[progress report]


I should have been documenting the progress more frequently.
In the design spec a month ago, I described a "HyperCard In The World" system, where you can point to physical objects, "bless" them, and attach and edit virtual "attachments", such as "collections" (data storage), and "daemons" and "illuminations" (processes), and this would supersede the virtual filesystem.
That's more-or-less built and working as described. In addition, the system is "built in itself", in that the system-level collections and processes that make the whole thing work are themselves physical objects with attachments.
The description below is rambly and hard to read (sorry) -- I wanted to get this documented before leaving for the all-hands, and I don't know how to talk about it yet.
I'll write up some more reflective thoughts on the system (what works well and what doesn't, what actually matters and why, future directions, philosophy) over the next couple weeks.
-------------------------------------
Library variations
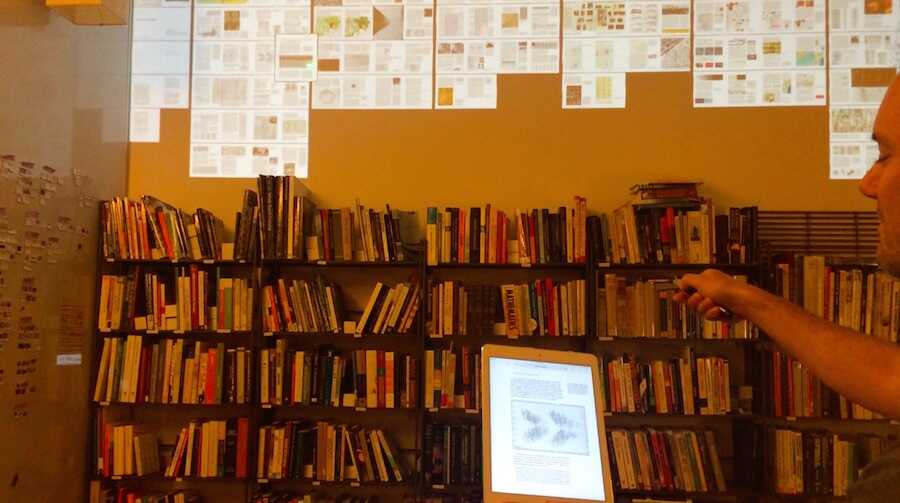
The initial impetus for the system was this library app switcher, so might as well start here.
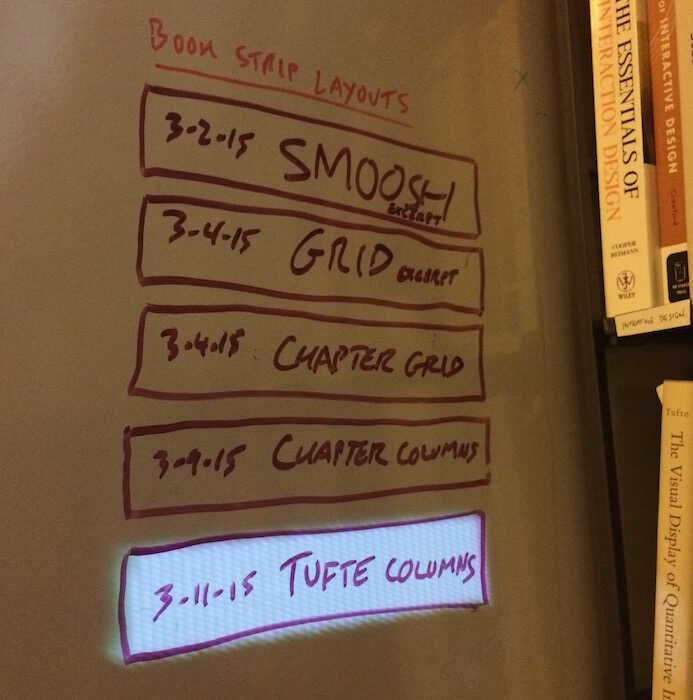
Each "app" is "inside" a box that I drew on the whiteboard. You activate the app by pointing to it with the laser pointer.
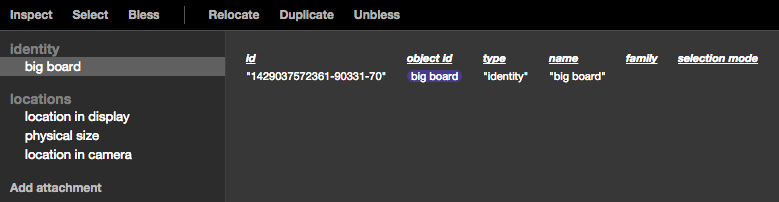
To see how it works, you go to the Object Inspector (currently at http://room.local/v2/o/ ), hover over "Inspect", and point to one of the boxes on the whiteboard. You'll see something like:
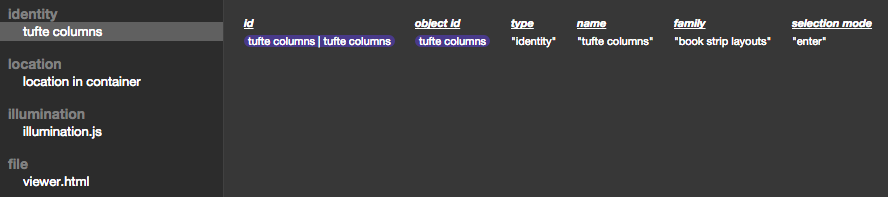
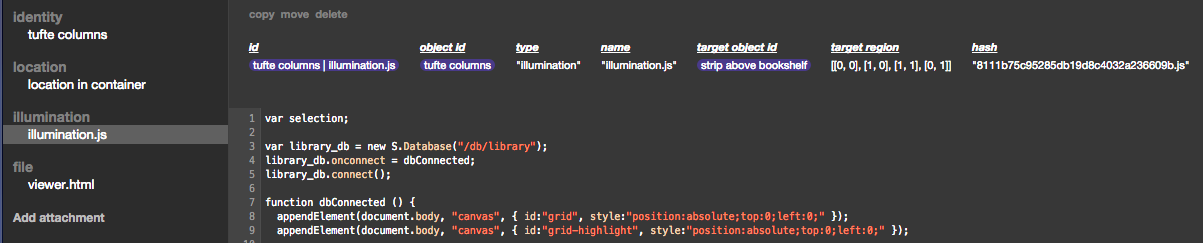
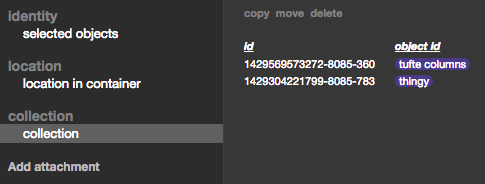
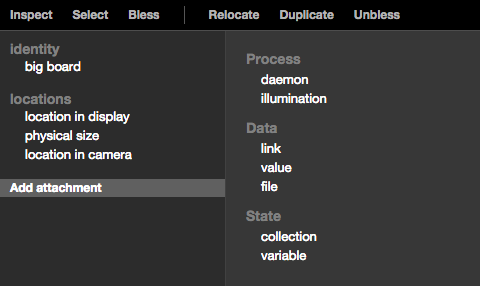
In the left column, you see the attachments that this object has: an identity --
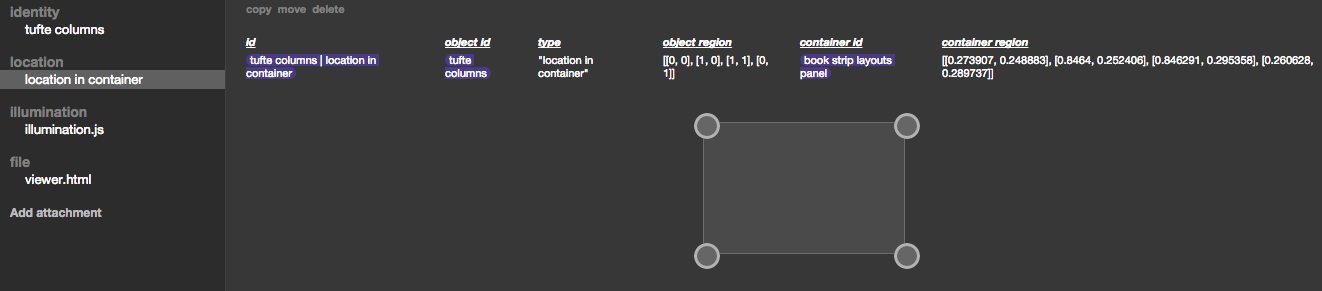
A location in container --
An illumination (this is the code that draws above the bookshelf) --
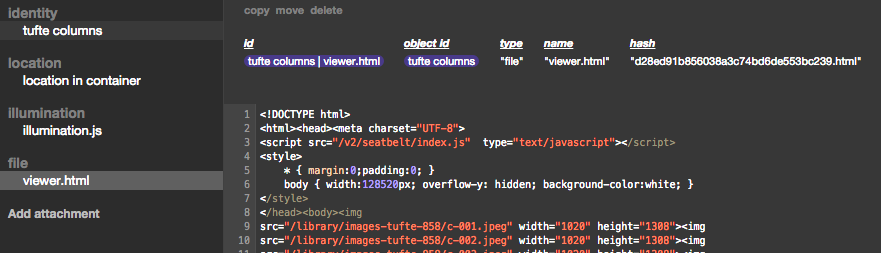
And a file attachment. (Most objects don't have file attachments. This one does because, in addition to its illumination above the bookshelf, it also presents a webpage for the iPad.)
In the identity, you see that I've specified this object to be a member of a family "book strip layouts", and set the selection mode to "enter". That means that, whenever the laser enters the object, it will be selected, and all other member of that family will be deselected. So, the group of boxes I've drawn on the whiteboard act like radio buttons. (This is similar to how you implement exclusive buttons in HyperCard.)
When I want to try out a new variation on the app, I draw a new box on the whiteboard, and then duplicate an existing object into it. I inspect the existing object, hover over Duplicate --
point the laser to each corner of the new box, clicking Duplicate after each one --
and when I've specified the four corners, I now have a newly blessed object, in its new location.
I give it a new name, edit its illumination, and that's that.
-------------------------------------
system implementation
In "version 1" of the room, databases and processes were visible on a screen. While better than conventional computer systems, which typically make them invisible, this was still too confining, and I couldn't easily explain how the system works.
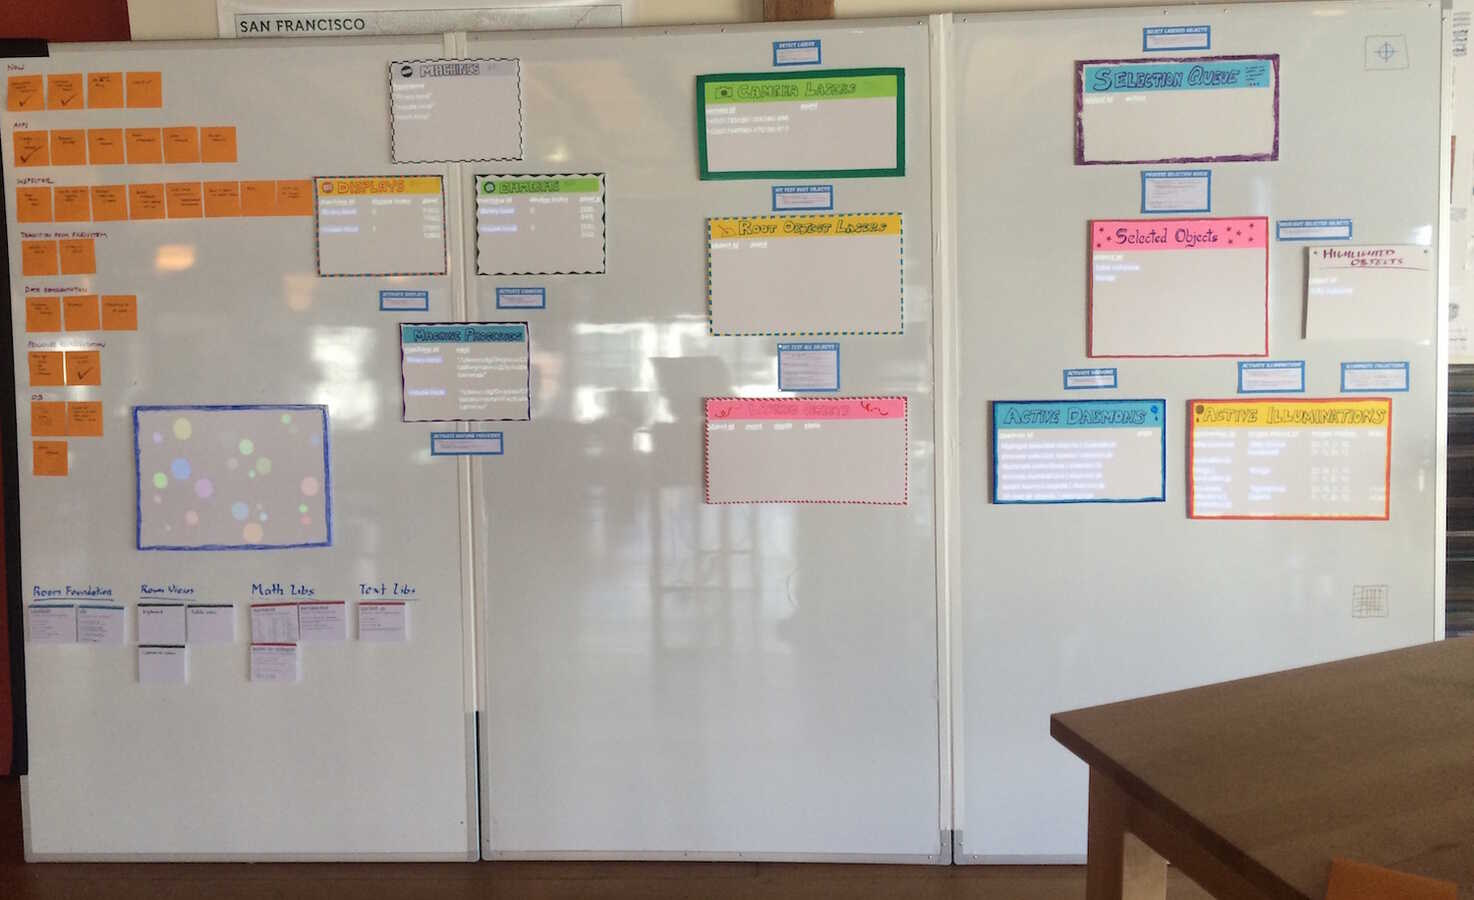
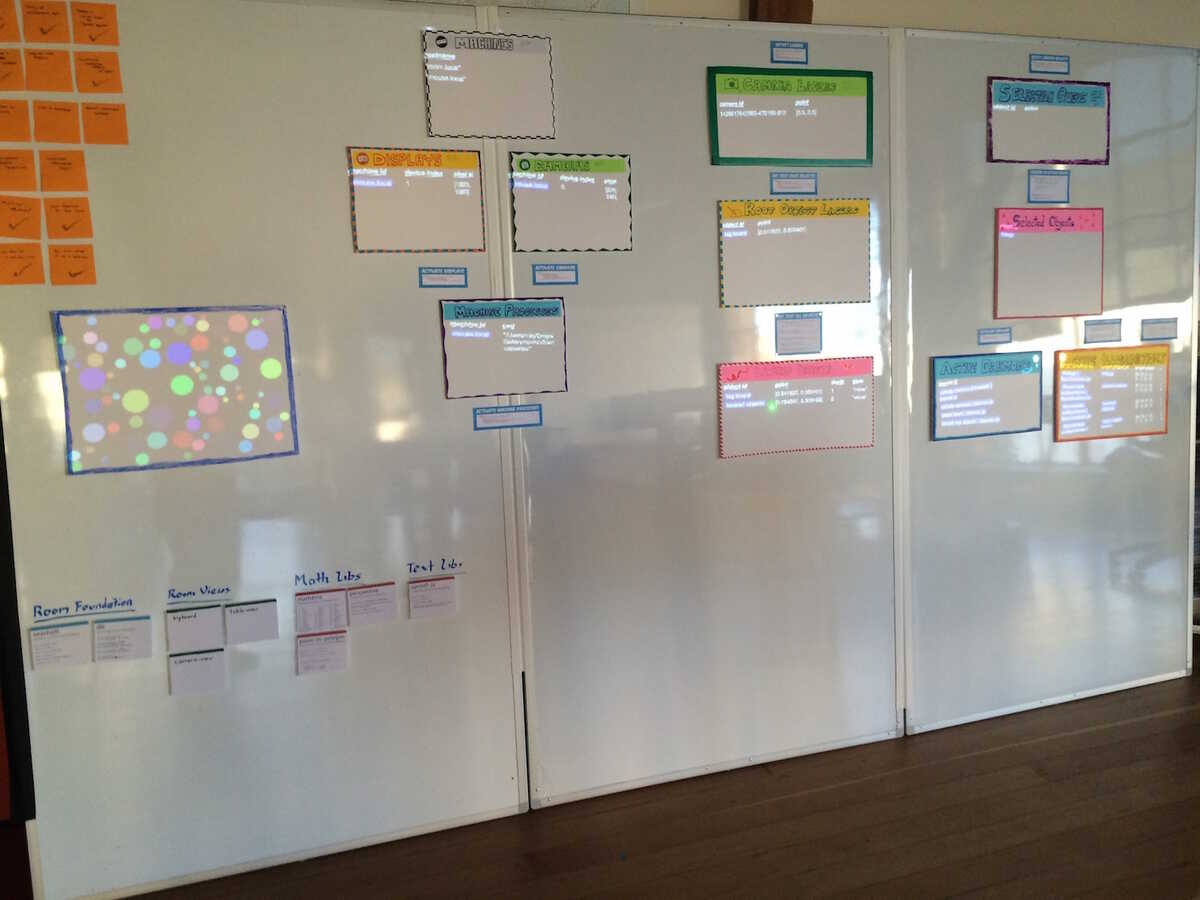
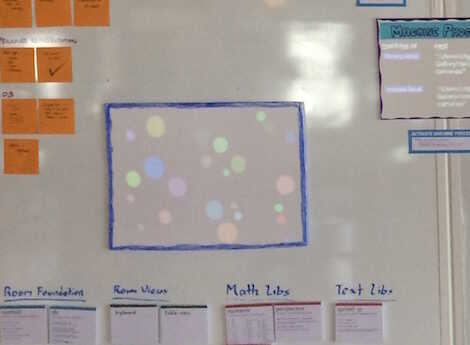
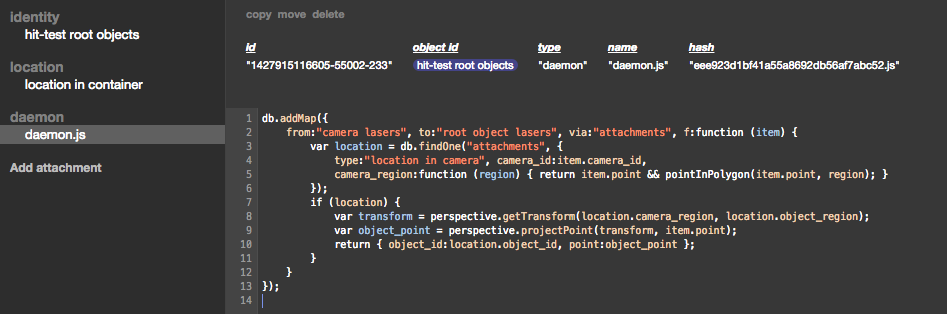
In "version 2", the machinery that implements the system is itself a large poster, where the collections (databases) are large blocks of magnetized foamcore which display their contents, and the programs are (currently) pieces of paper which display their code.
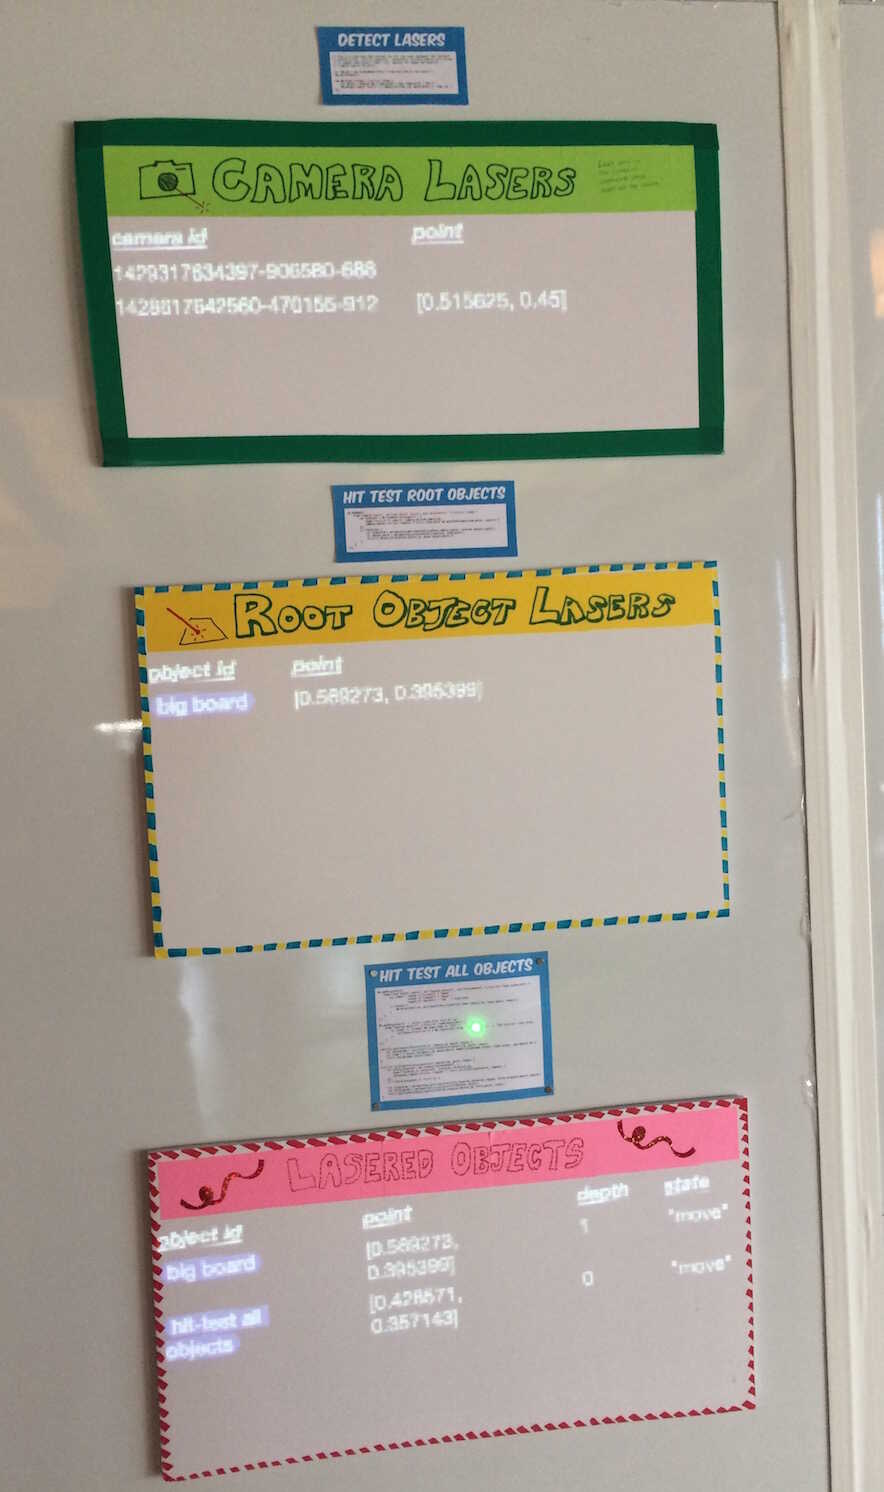
These components are spatially arranged to show the processing pipeline. The center column is the laser-tracking machinery:
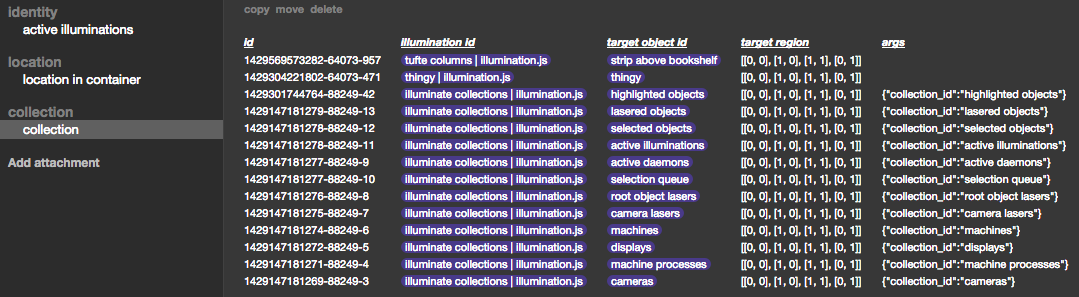
- A daemon called "detect lasers" finds the bright spots and puts data into the "camera lasers" collections.
- The "hit test root objects" transforms those data items into data in the "root object lasers" collection.
- "Hit test all objects" then transforms those into items in the "lasered objects" collection.
In this photo, I'm pointing the laser at "hit test all objects". You can see below, in "lasered objects" that it has been detected. (As well as its parent object behind it, "big board".)
How this all works, and what the values in the data mean (point, depth, etc), become obvious after playing with it for a little bit and seeing the data. (This the same idea as Nile Viewer.)
Objects that want to respond to the laser (such as the bouncy balls, or the library page spreads) simply watch for themselves in the "lasered objects" collection.
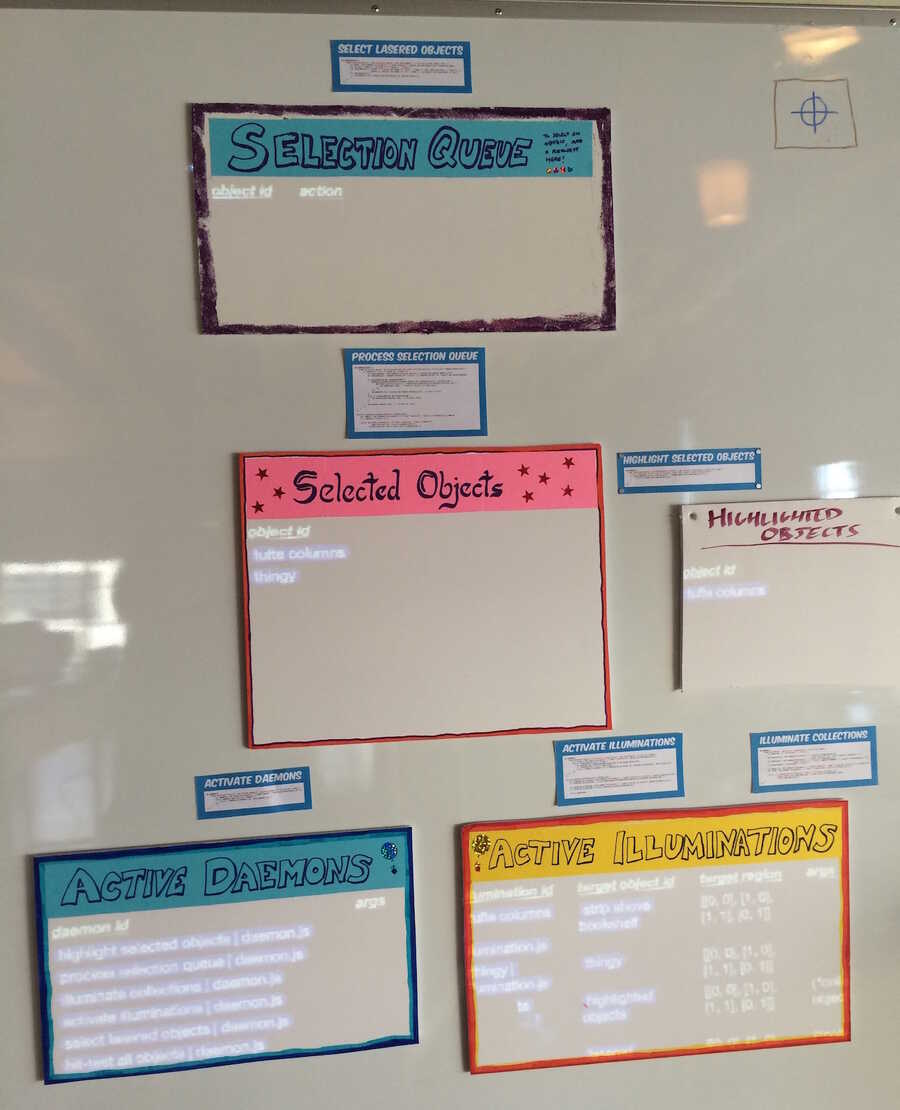
Also watching this collection is the selection machinery, to the right:
- A daemon named "select lasered objects" looks at the selection mode of the objects being lasered, and puts requests into the "selection queue" collection.
- "Process selection queue" takes entries out the queue, and manipulates the "selected objects" collection.
- "Highlight selected objects" will pass some of those selected objects to the "highlighted objects" collection.
- "Activate daemons" and "activate illumination" look to see if the selected objects have daemons or illuminations, and if so, adds an entry to the "active daemons" or "active illuminations" collections. These represent running processes -- running instances of the code that is attached to the selected object.
The "selection queue" appears empty here because "process selection queue" removes entries as soon as "select lasered objects" adds them. Eventually, all of these collections will display not just what's currently in them, but also what was in them in the past (darker, or below a separator, or something), so the selection queue will appear as a "log" of recent requests.
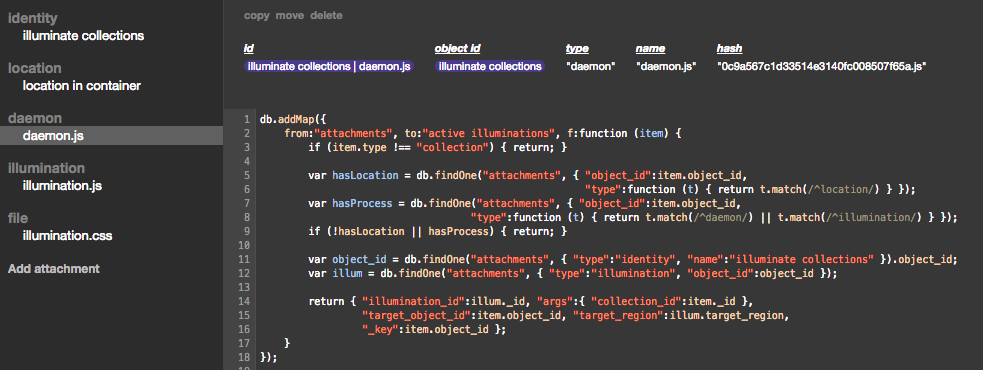
Above-right from "active illuminations", you'll see the daemon "illuminate collections". That's what's making all of these collection objects display their contents. The "selected objects" object, for example, only has a collection attachment. It doesn't have an illumination attached to it.
But the "illuminate collections" object has a daemon that looks for objects like "selected objects" -- objects that have collections but have no illuminations themselves.
"Illuminate collections" goes ahead and illuminates each of these objects by itself, by projecting its own illumination attachment onto them. (It does this by adding an "active illumination" whose "target object" is the object to be illuminated.)
That's an example of an object which illuminates a different object. (As opposed to a self-contained thing such as the following, which just illuminates itself.)
Not shown here is the "attachments" collection, which holds the data for all of the attachments -- identities, locations, daemons, etc. That's possibly the most "meta" collection, since an "object" is nothing more than a set of attachments.
A key point here is that there is no longer code in a "filesystem", no Finder windows, no directories to "ls". All code and data is attached to spatially-located objects, which you can read casually by walking by and looking, and edit by laser-pointing while in the Inspector.
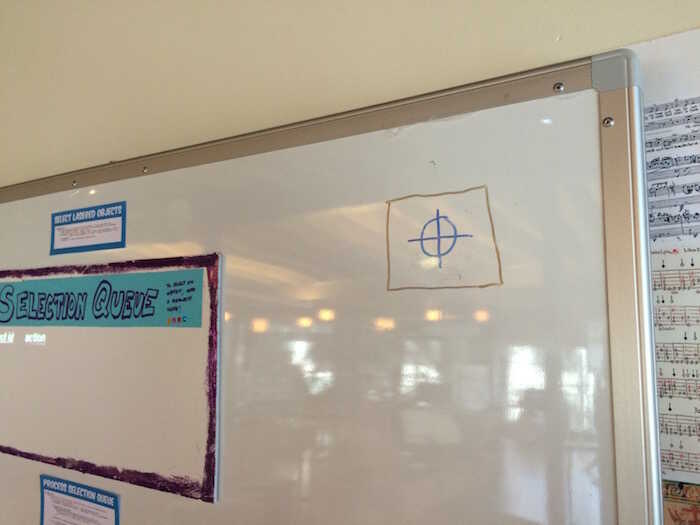
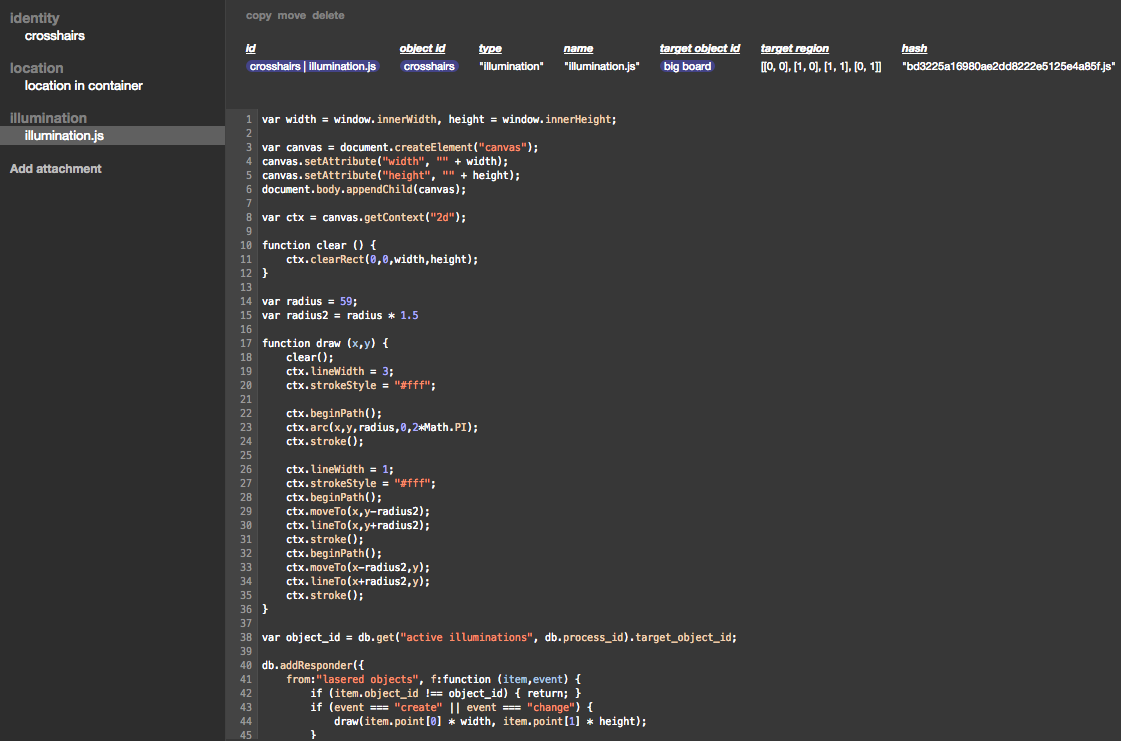
As an example, I wanted to be able to turn on a little crosshairs cursor, so I could see the offset between the camera and projector. So, I drew a box on the whiteboard:
I blessed the box in the inspector, and attached an illumination whose "target object" is "big board":
And now I can toggle crosshairs by pointing at this icon I drew:
I was able to create this program by thinking about it as code attached to a physical object, operating on a physical object, instead of virtual files in a virtual filesystem drawing to a virtual window.
---------------------------------------------------------------
Inspector
This is (currently) a website which allows you to see and edit the attachments of an object.
The UI of the inspector is still very rough. (And side note, one of the points of the project is to get rid of screen-based "UI", interacting in physical space instead of virtual space, so the inspector can be thought of as the vestige of the "old world" where we keep the things that we haven't yet figured out how to physicalize.)
At the top-left are "global actions":
- hover over Inspect (or just hold down the option key) and point to an object to bring it up in the inspector
- point to an object and click Select to toggle its selection (for things that you don't want to be directly selectable with the laser)
- point to the four corners of a new object, clicking Bless after each one, to bring it into the system
Followed by actions on the currently-inspected object
- point to the four corners of a new location, clicking Relocate after each one, to move it there
- point to the four corners of a new object, clicking Duplicate after each one, to bless the new object and copy all the attachments of the current one
- click Unbless a couple times to remove the current object from the system
If an object is blessed with four corners that are all within some other object, it gets a "location in container" attachment. (Its location is relative to some parent "container" object.) Otherwise, it gets the attachments "location in camera", "location in display", and "physical size". The latter two are guesses, which can be corrected in the inspector.
In the "v1" system, there were "surfaces", whose location in display was calibrated by mouse, then location in camera calibrated by laser. In "v2", there are only objects, and it doesn't generally matter at the application level whether an object is a root object (has a "location in camera" etc) or a contained object (has a "location in container".) The objects are located first by laser (and then location in display is adjusted in the inspector for root objects).
The upshot is that calibration is much easier than it was in v1. (And hopefully will get even easier as we get a better camera setup, depth cameras, object tracking, etc.)
These are the attachments that can be manually added through the inspector, pretty much as described in the earlier email.
For the file-like attachments (daemon, illumination, file), I wanted the file to be "in the database", so it would play with the versioning, rewinding, etc functionality that we will eventually have. But I didn't want the entire contents of the file to be part of the data item, and (for now) the file has to exist somewhere in the actual filesystem so that it can be loaded by Chrome, etc.
What I did was, when the file is "saved", it is uploaded to the server, which saves it into the filesystem by its hash. The hash is then returned, to be stored in the data item. Files are thus immutable, with a data item holding a "pointer" to a particular one.
This deals nicely with how to duplicate an object's files when duplicating the object. When attachments are copied from one object to another, the files come along automatically, because they are just referenced by hash. Changing the new object's code just stores a different hash in the new object, and the old object is unaffected.